|
| mail us
navigation
|
I have had a lot of problems with water and specifically water that runs in hoses. I did a lot of work to run water to my vegetable garden from the main house and then to run irrigation through a timer to the individual raised beds. Lots of cutting and joining of conventional hoses, soaker hoses, drip tape and polypropylene irrigation pipe. I read tons of stuff on the web but had to make many pointless mistakes since I could find no single source of material. Dribbles (ouch) here and there, the occasional pearl of a page, but never a composite page on hoses. Perhaps it is assumed that no one could be so stupid as to have problems with hoses (wrong in my case). Or perhaps this stuff is considered an essential rite of passage for the gardener, or perhaps it's assumed it will be handed down from master to apprentice (father/mother to son/daughter) through the ages. This is a collection of information (perhaps excessive) that I hope may save some of that pointless pain.
Notes:
In this page, due entirely to the laziness of a two-fingered typist, the following abbreviations are used. Double quotes (") are used to represent inches. Thus, 3/4" = 3/4 inch or 12" = 12 inches. Single quote(') is used to represent feet. Thus, 25' = 25 feet. When I remember (which is not often) I also add the equivalent metric measure.
I try not to mention brand or product names on any of these pages. First, because I am not promoting nor am I associated with any product, manufacturer or retail outlet. If I use something it is because it worked for me, in my situation. Second, there may be other, better or cheaper products out there that I did not find. You may be luckier than I was.
When we think about water use in the garden the classic image of water spraying out of a nozzle either held by a human or from some sprinkler attachment immediately springs to mind. Essentially, this form of water use mimics rainfall. With the possible exception of watering large scale areas such as lawns (where it may be the only viable method) in general this form of watering is wasteful (plants only take in water through their roots, water falling anywhere else is entirely wasted), possibly dangerous to plant health (wet plant foliage can be a breeding ground for 'bad things'), entirely ineffective (plants growing under plastic mulch) or wasteful of time (holding a hose with a spray may be a restful way to spend 15 minutes, but it is not efficient). Commercial producers have been irrigating, not 'watering', for many, many years, we gardeners should follow their lead, in my opinion, to both conserve water and our time (goodness knows there is no shortage of other work in the garden).
Much of what follows consists of general material on various hose types we can encounter in the garden, joining methods and irrigation methods. As part of the garden make over in 2014 I moved from classic spraying to 100% irrigation. The initial driving force was the use of plastic mulch for tomatoes, cucumber, peppers and aubergines and a number of pots for container growing experiments. I reasoned that since I had to provide some irrigation, why not move to 100% irrigation. Further, since I was only present at week-ends it was not reasonable to expect anyone else to water for me in dry spells so why not automate the process with a timer(s). Each raised bed has differing water needs based on the plant type so I also need to be able to control individual bed watering needs - this was getting pretty complex. But with some minor compromises and the investment of about $250 over two years I now have a fairly flexible system. I plan no further investments in the future - other than any immediate requirement if new beds are added.
First, I ran water to the vegetable plot. This was done by simply burying a normal 1/2" garden hose (encased in non-potable plastic conduit pipe - $30 for 100' - for protection against the occasional misplaced spade or fork). It is connected at one end to the house spigot, cut to length and a male GHT connector with a secondary spigot connected at the other end where it emerges from the ground. It is buried 6" deep simply for aesthetic and convenience reasons (lawn mower). The supply is not freeze protected so has to be connected in spring and disconnected, blown out (vacuum cleaner in reverse) and both ends sealed in late fall (with the ubiquitous duct tape). From the vegetable garden spigot a static hose, cut to the right length, is run to each vegetable bed (though various multi-way connectors and timers - described in nauseating detail - and connected to a soaker/drip hose in each bed. Initially, the soaker hose was simply snaked round the bed. This was messy (we tend to plant/seed in straight rows), dangerous (kinks could stop the water flow) and expensive (too much hose in each bed). Since each soaker/drip hose will provide water for about 8 - 9" on either side of the hose when lying on the surface I needed 3 runs in each 4' wide bed. I settled on the following design (tested in 2014 in two beds, fully implemented in all beds in 2015) and which I now call the 'paper clip' layout (you may need a giant leap of imagination to see the reason why):
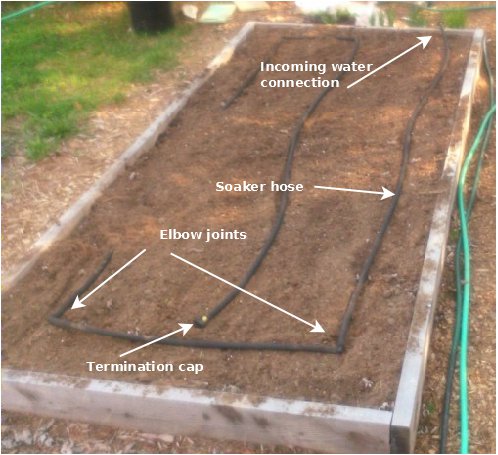
This shows the 'paper clip' design used to provide 3 runs along the 10' bed. A total of 4 elbow joints are used and approximately 38' of soaker hose used. Water is not yet connected and soaker is temporarily buried on left side of bed to hold cold (unpliable) hose in place before covering with plastic mulch. Water will seep to about 8 - 9" on either side of hose providing full coverage of the bed. Photo taken early May 2015 with snow still in parts of garden.
When you simply use garden hose with a nozzle or spray then life is simple. You connect the hose, turn on a spigot and water comes out. If you are lucky, and the hose is not too long, then there may even be enough water to do the job. Once you start irrigation or running water to various locations then a whole load of other stuff becomes important. Like joining hoses, water pressure, choosing from the varieties of hoses available, choosing the right method of irrigation. Most of this stuff is covered below to a gruesome level of detail. You will regret reading this and may have to lie down in a darkened room for a couple of hours afterwards to recover.
North America: There are two thread types that are commonly used when joining pipe work and hoses used to distribute water for garden work or in irrigation systems. National Pipe Thread (NPT, of which there are many sizes) and Garden Hose Thread (GHT, of which there is one 3/4" size). NPT and GHT systems are not compatible and you will need a converter or adaptor to join them together. NPT to GHT Converters/adaptors tend not to supplied in big box hardware stores and you will likely have to look for specialist (typically irrigation) suppliers or on the web.
Note: You will occasionally come across the acronyms FHT (Female Hose Thread) and MHT (Male Hose Thread) which refer to male and female hose connectors (see Joining Hoses below).
If you purchase classic garden hoses (including most soaker hoses and some drip tape systems clearly marketed for garden use) then they will always be fitted with GHT connectors. However, most (but not all) irrigation products tend to use NPT (National Pipe Thread). Further, if plumbers installed an outdoor water distribution system then they will invariably use NPT for interconnection of the pipe work, though hopefully the final spigot or faucet will be GHT. Most products are not labelled to indicate which thread type is being used. If the type of product is not clearly either for use in the garden (it will be GHT) or for use by plumbers or irrigations specialists (it will be NPT) then either ask before buying (50% probability of getting a right answer) or have an example of the thing you are trying to connect to in your pocket and try it before buying.
If all of this sounds pretty pedantic - it is, for a good reason. If you simply buy and use garden hose you will not generally, have a problem. Move off the beaten track by doing something even remotely unusual and you may start to have expensive, frustrating, fun - quickly.
Rest of the world: Much of the rest of the world uses British Standard Pipe (BSP) threads which confusingly also uses a single 3/4 inch thread. However, the North American GHT (includes Canada) uses a slightly different thread density. Specifically, North America GHT uses 11.5 threads per inch (TPI), whereas BSP uses 14 threads per inch (TPI). They can be joined together with a big wrench and a good washer (or three) (see Joining Hoses below).
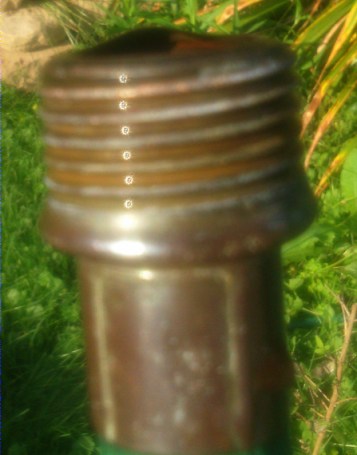
Most hoses come fitted with a male GHT connector at one end and a female hose connector at the other end. The connectors may be made of either plastic or metal (typically bross). The spigot or faucet at the house that supplies water to garden typically has a male GHT thread.
A metal Female Garden Hose Connector screwed into a male spigot.
A metal Male Garden Hose Connector.
Garden Hose comes in 1/2", 5/8" and 3/4" inch internal diameter sizes and various lengths (25', 50', 75' and 100' are the most common). Irrespective of Internal Diameter, they can all be joined together using the standard (fitted) 3/4" GHT male and female hose connectors (or unions). So what's the difference between the various internal diameter hoses? The larger the internal diameter the more volume of water can flow through the pipe in any given time (the flow rate) due simply to the lower relative friction in a larger diameter hose. If you have very heavy water usage (say filling a swimming pool or a big sprinkler system) then it may warrant 3/4" (the most expensive) hose size but for most typical garden use 5/8" or 1/2" (less expensive) hose is more than adequate. If you join different internal diameter hoses together then the total available flow at the hose end is limited to the smallest internal diameter in the chain. Thus, if you join a 3/4" hose and a 1/2" hose then total flow is limited to that of the 1/2" (in this case) hose. While it is sensible to connect the largest diameter hose next to the primary inlet (faucet or spigot) there is no reason to do so, especially if it involves disconnecting and reconnecting hoses for a temporary arrangement. However, if the arrangement will become permanent it's worth the effort to make sure the largest internal diameter is first in the chain since the speed of the water exiting from the smallest diameter hose will be greater than if the arrangement is reversed.
Note: The above information applies when connecting typical (25+') hose lengths but not for very short lengths. If, for example, a very short 1/2" diameter hose (less than 3 - 4') is used to connect two 3/4" hoses then the flow is determined by the 3/4" hose. The water speeds up in the small diameter hose to maintain the flow rate and the short section has modest friction losses, whereas in longer lengths of small diameter hose the friction losses significantly increase, effectively reducing total flow rates to that of the smallest hose diameter.
Outside dimensions of garden hose varies slightly depending on the construction material. Garden hoses are sized by their internal diameter (3/4", 5/8" and 1/2").
Total flow through a garden hose (flow rate) is typically measured in gallons per minute (GPM) or in low volume drip-type irrigation systems in gallons per hour (GPH). The flow rate is determined by three factors. The internal diameter of the hose (the larger the diameter the more flow is possible due entirely to lower friction losses), the length of the total hose run (losses are mostly due to friction which obviously rises as a function of length) and the water pressure (see Water Pressure and Flow Rates) measured in PSI (or Pascals) at the primary inlet (faucet or spigot). The maths of water flow stuff is horribly complicated but this handy calculator can be used for quick answers to flow rate issues. In general, for any given water pressure the maximum flow occurs when using the largest possible internal diameter hose over the shortest hose length practical. A very rough rule of thumb says that every extra 100 feet of hose will halve the flow rate. Or an even rougher equation says, long hoses = bad idea, short hoses = good idea. Flow rates change even more dramatically for lengths less than 100 feet. (Consult the calculator link above for real information based on your conditions).
Water pressure is either your friend or your enemy in the garden depending on the application. It's your friend if you are concerned with water volumes, but it can be your enemy in low pressure systems such as drip irrigation (though there are multiple methods available to mitigate high pressures). Water pressure in North America is measured in pounds per square inch (PSI) and in the rest of the world in Pascals. Domestic water pressure from a municipal or water company system in North America is usually quoted as being in the range 50 to 100 PSI. In practise 40 - 70 PSI is a more normal range and indeed anything over 80 PSI is generally regarded as high. If you have no idea what your water pressure is (and most of us don't) then call your local water supply organization (or check their web site) and ask them for the static water pressure at your address. They might even give you the right answer. Assuming you can reach a real human being. Failing everything else you can measure the pressure with a water pressure meter (around $10 - $15 at big box hardware stores).
If you are on well water the water pressure will be determined by the pump installed by the contractor and should be specified in your contract documents or the pump specification.
While it's always useful to know your precise water pressure (since certain forms of irrigation equipment can be damaged if it's too high) it is possible to get a quick and dirty measure (a good enough measure) at the primary inlet (water faucet or spigot at the house) or any other location in your garden by using the following two step method:
You'll need a stopwatch (a decent second sweep hand on a classic wristwatch will do or most modern mobile phones have a stopwatch function) and container with a known capacity, such as a 5 gallon paint bucket, alternatively most watering cans have volume capacity level marked on the outside. The container should be as big as practical (5 gallons is plenty) and certainly a minimum of 2 - 3 gallons to minimise calculation errors.
Empty the container and place it at the faucet or spigot (or other on/off device such as a spray outlet) where you want to measure the water pressure. If you have one of those multi-spray nozzles set it to the one that gives the most water volume since the others will increase resitance and give a lower figure). Set your stop watch to zero. Make sure nothing else in the garden is using the water supply (no one is watering the lawn) and there is no major water usage in the house (dishwasher, washing machine or someone having a shower).
Start the stop watch and turn on the faucet or spigot as fast as possible to full flow. Do both at the same time. You may need an extra pair of hands and some verbal communication (like "Go" or "Now") for this.
When your container has reached its limit (5 gallons or 3 gallons or whatever) stop the timer (and you should probably turn off the spigot/faucet at roughly the same time or wet feet may be your only result). Note the time taken to fill your container in seconds. A pencil and piece of paper seriously help here. Memory can work also but is not infallible, especially if you and the extra pair of hands decide to have a domestic dispute during the measurement.
Empty the container and repeat the test. If the time of the test is within a few seconds you have a reasonable basis for calculation. If the times vary by more than 5% keep repeating until you get consistent results. If your container takes less than 15 seconds to fill you will likely get inconsistent results. If necessary get a bigger container and restart the test sequence.
Time to calculate some results. First, calculate the flow rate measured in gallons per minute (GPM) using the formula:
(Volume of container in gallons / time to fill in seconds) x 60 = flow rate in gallons per minute (GPM)
Examples:
(5 gallons / 70 seconds) x 60 = 4.28 GPM
(5 gallons / 22 seconds) x 60 = 13.63 GPM
(3 gallons / 43 seconds) x 60 = 4.18 GPM
As well as using this value for the next calculation permanently note this value (you do keep a gardening calendar or diary, don't you?) since it will always be useful. Maybe even measure the flow rate for various key places in your garden.
Note: Some systems (specifically drip irrigation) will require this flow rate in GPH (gallons per hour) in which case just multiply your result above by 60. Thus, if the value is 4.28 GPM then the equivalent GPH is 4.28 GPM x 60 = 256.8 GPH.
Second, calculate the approximate water pressure at this point using the following formula:
To be supplied.
Examples (using figures from calculation above):
To be supplied.
In normal gardening use I have dealt with 4 different hose types and don't consider that I have done anything particularly adventurous:
Conventional Garden Hose: Discussed ad nauseum above. Comes in 1/2", 5/8" and 3/4" diameters. I use only 1/2" for the vegetable garden and it is of the cheapest-I-can-find variety since I end up cutting the hose to perform various tasks. My use in the vegetable garden is exclusively static - that is once the hose is installed it stays in place until the end of the season. The more expensive medium-duty and heavy-duty hoses typically refer to those that are being constantly rolled up and unrolled. I use a couple of (much more expensive) non-kink medium-duty 5/8" hoses for watering flower beds and pots in the rest of the garden, even one of those curly extender hoses (my friend likes to keep these things as small and unobtrusive as possible - ugly, she says). Wimpy stuff. Joining/Splitting Conventional hoses.
Soaker Hoses: Soaker hoses are a form of drip irrigation, marketed primarily to gardeners. They are usually 1/2" diameter and made of a porous material (typically ground up re-cycled car tires) and in their garden variety come with male and female GHT fittings and usually have a termination cap at one end. I normally buy them in 50 foot lengths and they are very reasonably priced. Water seeps out of the porous hose material. You have to be very careful with water pressure - too high and you can literally blow holes in the stuff. The quality varies enormously in my experience and water cleanliness is very important since fine particles, in well water especially, can clog the holes in the material (a fine filter from an irrigation supplier can ameliorate this problem). They can be buried, so could be used in places where aesthetics are important. The manufacturers all say they can be left outside during the winter but in our harsh Canadian climate I would suspect all kinds of unpleasant things could happen. I have never tried it. I have a number of soaker hose installations for irrigating raised beds and I'm slowly replacing them with soaker drip tape (see below) if they fail. I've had problems with soaker hose twice now - on both occasions (second year of operation) I ended up replacing the hoses. I have no idea why they failed. Maybe they hardened in the sunlight, maybe the water pressure had been too high at one point, maybe they were clogged, maybe... Who knows? And that is the point. I'm happy to read, and follow, any manufacturer's recommendation but have little time for anything that does not work reliably thereafter. When they work they do a good job, many people swear by them and until my failures, frankly, I did also. Perhaps I've just been unlucky and I'm certainly in no hurry to replace the remaining ones. Joining Soaker hoses.
Drip Tape: Drip tape is a form of irrigation used extensively by commercial horticultural producers. The tape is a bare flattened plastic tube with slits cut every 8 to 12" inches (spacing varies with manufacturer) on one side - the slit side is placed face down and water under very low pressure (typically 5 to 10 PSI) is emitted via the slits directly to the root system. It can be buried. It typically comes in a variety of wall thicknesses (8 to 15mm) and diameters - if a flat tape can be said to have a diameter (5/8" seems very common) as well as (usually very long) lengths and can be simply rolled up at the end of the season. Life span varies from 3 to 10 years. This is commercial grade drip tape and normally comes in a minimum of 100' rolls and costs about 10 cents or less per foot.
There is a variant of this commercial drip tape that is marketed for garden use as an alternative to classic soaker hose. For want of a better description I'll call it soaker drip hose (that's not what the manufacturers call it) to differentiate it from classic soaker hose and classic drip tape. It is available under at least two brand names from some big box hardware suppliers. It differs from classic drip tape in that it uses 1/2" tubing (not the more common 5/8" drip tape) and is sold in 25', 50' and 75' rolls with GHT fittings on both ends (with an end cap on one end like soaker hose). The tape has tiny pin-prick holes every 4 - 6" and is covered in a nylon-like woven fabric. Water emitting from the pin-prick holes soaks along the fabric before leaching into the soil thus ensuring an even water distribution similar to classic soaker hose. The fabric covering ensures that roots cannot enter and block the holes (though the tiny holes can get clogged with water borne particles - mitigated by a filter). Due to its design (small holes rather than the large slits of classic drip tape) it typically can be used at much higher water pressures than drip tape and soaker hose, but will also operate effectively at very low water pressures (around 2 PSI in my gravity fed fertilization application). It can be buried.
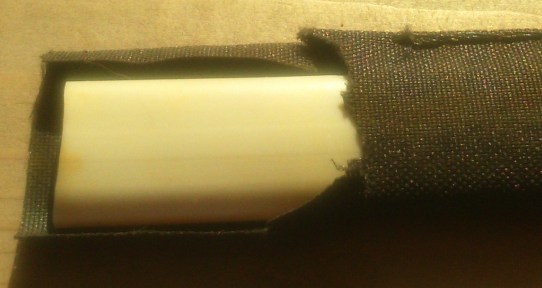
Soaker Drip Hose with fabric partially removed to expose the flattened plastic pipe.
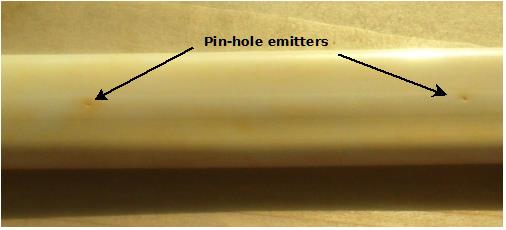
Soaker Drip Hose showing barely visible pin-prick holes in flattened pipe (which is normally fully covered by woven fabric).
I love this stuff. I stumbled across it in 2014 and ran it in two beds that have never had problems (v 4 with classic soaker hose). It is about the same price as classic soaker hose and double the price of commercial drip tape. When classic soaker fails I now replace it with this soaker drip tape. Joining Soaker Drip Tape.
Irrigation Pipe (Hose) Irrigation equipment comes in a bewildering range of types - drip emitter, spray stakes, micro sprays etc. I experimented with a small number during 2014 to irrigate 5, 10 gallon pots that I use to experiment with container growing. In 2015 I finally settled on, and have implemented, a timer based system that waters around 25 pots at various location throughout the vegetable plot all run from a single 1/2" 100' roll of UV treated polyethylene (hereafter simply poly) irrigation pipe with garden hose adaptors at both ends. All irrigation systems use an insertion technique whereby a barbed fitting (1/4" at its widest point) for the particular irrigation system (spray, drip emitter etc.) is forced into a small hole cut in the pipe at the required location (the aptly named 'goof plugs' can be used to block unwanted holes) and the poly pipe, due to its physical properties, snaps back into place to seal the insertion hole. Special tools are available to cut the initial hole and these are well worth the modest investment if you will do a lot of work with irrigation. For small volumes you can use a 1/32" or 1/16" drill bit but you need to ensure that the drill does not wobble and enlarge the hole (yes, I have done that - the only solution is a goof plug or to cut and join the pipe). Joining Irrigation Pipe
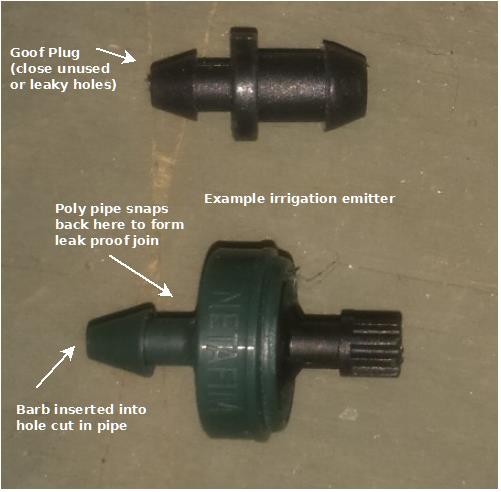
The emitter shown is simply one of a confusing variety of types available, each designed for a particular application. Choosing the right type is a matter of experimentation, serious thought or visiting locations where the systems are in use.
I did a lot of cutting and joining of conventional hoses to create a water distribution set-up to feed each raised bed. The installation is static. I set up the hoses at the beginning of the year (early-mid May) and they stay there until I take them in around mid October. All hoses are cut to the required length (to minimize stumbling) and appropriate GHT connectors added as required. All hoses are of the cheapest-I-can-find 1/2" diameter variety.
We have only one local big box hardware store that sells low cost hose connectors in a variety of formats and sizes. Connectors can be either brass (expensive) or plastic (cheap). In my static configuration there is no advantage in buying anything but plastic. If I was constantly connecting and reconnecting hoses or left them out over the winter then I might consider brass.
There are three types of end connectors (male and female varieties) available in my local store:
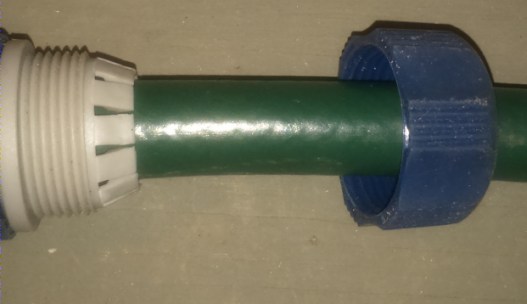
Compression Connectors: These are very quick to fit (a matter of seconds), very reliable when using conventional hose and require no tools (apart from a reasonably strong arm to tighten the nut). They work by compressing a toothed ring of plastic onto the hose using a screw-on nut. They are useless for soaker hose or especially soaker drip hose because they provide an inadequate grip due to the spongy nature of the hose material (soaker hose) or the thinness (soaker drip hose) and tend to blow-off under any, even modest, water pressure or leak like a sieve with very low water pressure (while a leaky soaker hose sounds like an oxymoron the objective is to water plants evenly, not drown those closest to the incoming water connection).
Screw-on nut of compression fitting placed over hose which will be inserted over the center boss of the fitting.
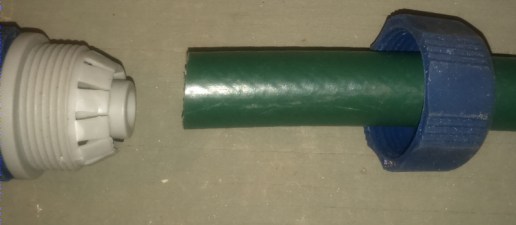
Hose inserted into compression fitting. The screw-on (blue) nut is simply hand tightened (compressing the plastic fingers onto the hose) to achieve a leak-proof join. No special tools are required.
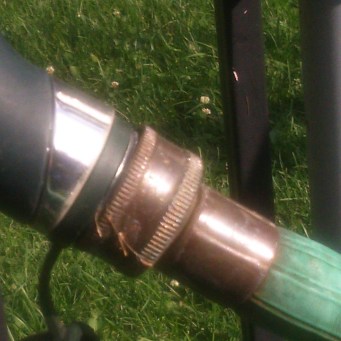
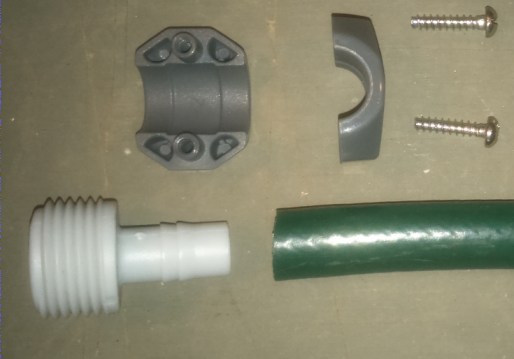
Clamp Connections: The clamp connection consists of a barbed fitting that is inserted into the hose and a plastic clamp screwed into place to ensure a tight fit. This works reasonably well on all types of hoses (conventional, soaker and soaker drip) but takes a couple of minutes for each connection and requires a screw-driver (not exactly high technology). It is also possible to place the screw on the wrong side of the clamp fitting (yes, I have done that) which makes a nice, leaky join. When using conventional hose the end of the hose should be cleanly cut, as flat as possible, with a sharp knife and the hose inserted until it touches the stop in the connector to ensure a leak proof join. The flexible nature of soaker drip hose can make this a fiddley connector to work with - it is, however, the only connector that does work with this type of hose.
Clamp fitting fully disassembled. The hose will be inserted over the barbed connector on the left and the clamp assembled, with its recessed center placed over the barbs, and then securely screwed to create a tight fit.
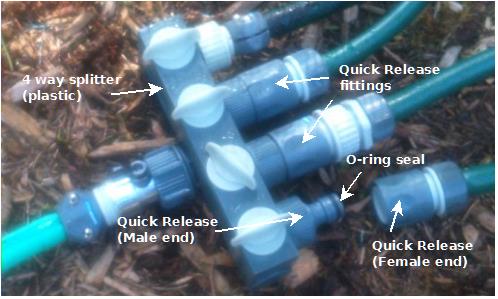
Quick Release: This fitting has a male and female part and allows for rapid connection and disconnection of hoses using a plug-in method. Most have a self-sealing capability which will stop the water flow when they are released, meaning that hoses can be connected and disconnected while the water is still on. Handy if you are long walk from the spigot, however, you will get soaked, briefly, if the water pressure is high (yes, I have done that also). They provide a remarkably secure, leak-proof join and I now use them exclusively for connections to my primary distribution system. They are about twice the price (~$7 in plastic) of normal male or female ends. Both the male and female ends are available in both plastic and metal. I have used both and now use only the plastic versions. The first thing to wear out with extended use is a small O-ring that provides the internal water seal (which can be replaced for pennies) not, in my experience, the outer housing.
The normal method of joining garden hose is, obviously, to use the fitted male and female GHT connectors. However, there are occasions when you may need to join hoses directly, such as when a spade or fork has been energetically used in the wrong place. Both clamp and compression fittings come in what is typically called a 'hose repair' variety (essentially a back-to-back connector) that is both cheap and effective. The hose ends to be joined should be cleanly cut with a sharp knife before using the connector.
Soaker hose is only available in 1/2" diameters in my experience. Standard 25' or 50' rolls are fitted with Female and Male Garden Hose connectors at each end and normally have a termination cap on the male end. When cutting soaker hose to make my 'paper clip' raised bed irrigation from a new roll I cut the first long run from the female connector end and the last (inside) run from the male end (saves having to add connectors unnecessarily). However, when enough spare bits are left (I normally use approx. 38' from a 50' roll for each bed) I use a clamp type female and male connector for conventional 1/2" hose (see Joining Conventional Hoses above) and fit a standard end cap on the male end. The corners of the 'paper clip' design need elbow (90o) joints which are not available for hoses. Instead you need to use 1/2" barbed elbow joints which in my experience are difficult to find in other than very specialist plumbing locations. These barbed connectors are inserted into each side of the hose (there is a raised stop in the elbow to indicate when it is fully inserted) and then secured with nylon tie wraps. If tie wraps are not used then even slightly elevated water pressure can easily blow the joints apart and then the drip irrigation turns to flood irrigation at the break with no down-stream irrigation (yes, it happened a couple of times before I, finally, decided to fix it).
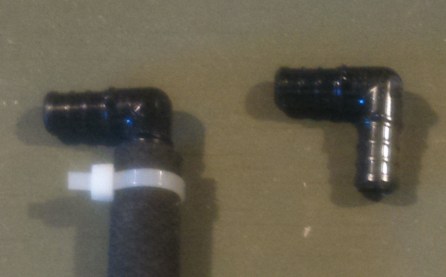
One side of the plastic barbed elbow on the right is inserted into the hose and secured with a nylon tie wrap pulled reasonably tight. Obviously, another hose is connected to the other side of the elbow barb when used in the final assembly.
Soaker drip hose is a bit more difficult to work with but the same basic rules apply as for soaker hose. First, use the fitted female and male garden hose connectors as respectively the first and last runs of the 'paper clip' layout wherever possible. The corners again will use 1/2" elbow joints (available from specialist plumbers) secured with nylon tie wraps. However, since the inner plastic pipe is flattened it can be a tad awkward to get good connections since any longitudinal pressure will simply collapse the pipe. I now use a bowl of hot'ish water, expose the flattened pipe for about 2 inches by pushing back the material and holding it using something like a clothes-peg. Soak the exposed pipe end in the hot'ish water for a couple of minutes to make it supple and use a screwing motion when inserting the elbow joint. While the final join is usually more reliable than that of a classic soaker hose the tie wrap ensures that you will not have a break even at relatively high water pressures. Female and male hose ends (clamp type) for conventional hoses can be used where necessary and the hot'ish water method again ensures the best connection.
Soaker Drip hose elbow connection hard at work in a raised bed with both tie wraps exposed. Lousy photo but hopefully you get the idea.
Poly irrigation pipe is available in 1/2" sizes. However, its physical characteristics mean that conventional hose connections or any type will not work (unless you like leaks, in which case they work perfectly). Instead, special poly fittings are available with Garden Hose connectors for male and female ends, pipe joining (coupling), elbow joints and T-pieces (available from the same suppliers as poly irrigation pipe). While a variety of connector styles are available those marketed as 'Direct-Lock' (or Direct-Loc) are a joy to work with, connections take seconds and are a solid as a rock.
A Poly Irrigation Pipe to Male Garden Hose Direct-Lock connector.
A Poly Irrigation Pipe to Poly Irrigation Pipe (coupling) Direct-Lock connector.
Poly Irrigation Pipe emitters (the things that give out the water) are available in a confusing range of styles to suit almost every possible need. I use poly irrigation exclusively for watering 25 (currently) pots in a variety of sizes (from 3 to 10 gallons) using a single 100' poly pipe that meanders round the vegetable plot with 2, 4 and 6 pot emitters inserted where required. The drip emitter I have chosen to use is uniquely suited to my application and is probably of little interest to the rest of the world.
There are a number of cases where water pressure may need to be reduced (especially where it is > 30 PSI) to avoid damage to hoses or even to make things work at all. I have come across three cases so far where it was essential:
Classic Soaker hose can be seriously damaged if water pressure is over 20 to 30 PSI, at the other end of the scale it will work at much lower pressure (as low as 2 PSI) quite happily.
Soaker Drip Hose is much less vulnerable to higher pressure as a consequence of its design, nevertheless, high pressure will tend to open up the pin-prick holes through the abrasive action of high pressure water over a period of time.
I have a super cheap mechanical (clockwork) water timer that I occasionally use for crash irrigation. High water pressure was preventing the valve from being closed - the internal spring was simply not strong enough to close the valve against the water pressure. The timer would start, run down its clock and fail to stop. Reducing the water pressure makes this device work perfectly.
There are two ways to reduce water pressure. Using the rough method or the smart method. Nothing wrong with the rough method, other than it will only give approximate results, but it is cheap. All my raised bed irrigation systems are fed from 4 way adaptors (see here). Each adaptor outlet has a 90° On-to-Off knob where 0° is fully off and 90° is fully on. By simply turning the knob by 20° or 30° I can change the water pressure and flow to any bed. The poor man's pressure regulator. But occasionally a useful tactical solution. The smart way is to use a pressure regulator available from most irrigation suppliers. They usually come in a range of pressure ratings, are available with male and female garden hose thread and cost approx. $5 each. They give accurate results and could save a substantially higher investment in soaker hoses. Well worth the cost.
Pressure regulator (about 4" long) with female and male garden hose connections.
I decided that since the irrigation system was in place and since many fertilizers (both organic and non-organic) are available in soluble form it should be a breeze to simply run the fertilizer solution through the irrigation system. I discovered that this is called fertigation in the irrigation industry. I wanted something real simple and real cheap. I looked at venturi injectors (fiendishly cunning devices and small ones cost around $20) but they needed a minimum of 20 PSI to operate. I'm running my soakers around 10 PSI or less. So after a lot of web research I essentially drew a blank with my cheap and simple criteria. I needed a low pressure way of putting my fertilizer solution through the irrigation hoses - plenty of low pressure pumps out there (for pond and fountain use) but they all started around $50+. What about our friend gravity? I liked the idea of the cost of gravity. Each 1 foot vertical height is approx. 0.43 PSI. I took a 5 gallon paint bucket, inserted a water barrel to garden hose thread connector in its base. I stuck the paint bucket on a ladder, connected a hose with a quick release connector into my irrigation system and kept raising the bucket up a step until the liquid started to come out of the soaker hoses (classic soaker hose and soaker drip hose). At 5 feet (~2 PSI) it started to visibly work. So that is my fertigation system. A paint bucket on top of a 5 foot ladder. Works great. Cost about $12 (the ladder is not included - everyone has a ladder lying around?). Elegant? No. Effective? Yes. It takes around 45 minutes to empty the 5 gallon paint bucket to 3 raised beds, shorter if there were more beds, longer if there were less. In 2016 I will add a 200 mesh filter (from irrigation suppliers) to the system since I'm starting to experiment with compost tea fertilizers and they can have lots of tiny 'bits' (even after straining) that could clog the soakers.
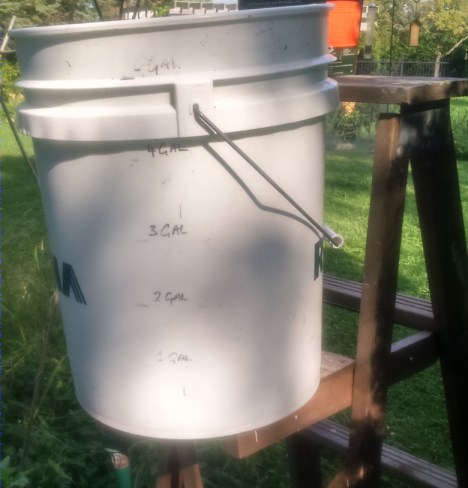
Gravity fed (5ft) fertigation system. The feeder hose is visible at the bottom of the picture (and connects to a rain barrel connector with garden hose thread) which has a simple on/off spigot at the paint-bucket end and a quick release fitting at the other.
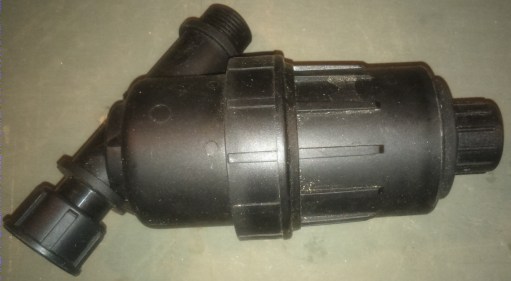
Water filter (about 9" long). This is fitted before (closer to the water supply point) any pressure regulator.
Problems, comments, suggestions, corrections (including broken links) or something to add? Please take the time from a busy life to 'mail us' (at top of screen), the webmaster (below) or eagle-eyes at hillofbeans. You will have a warm inner glow for the rest of the day.
|
Copyright © 2005 - 2026. HillofBeans.Org. All rights reserved. |
web-master at hillofbeans Page modified: January 20 2022 |