|
| mail us
navigation
|
Raised beds are a popular method of gardening. In my case they are essentially a defensive technique to isolate the growing areas from the surrounding environment and to provide a focus for soil amendment and mediation. Additionally, I hoped they would provide drainage to what is otherwise a very heavy blue clay soil. (Due to the method used this has not been entirely successful as explained below.) Raised beds are relatively simple structures (which is why they appealed to me) but there are a lot of parameters that can determine how useful (or not) they can be. The following information discusses my successes, failures (of which they are many) and my current thoughts on this, apparently, simple topic. The views expressed are not those of an expert, simply those of one who has traveled down this road. They are offered in the hope that they may at least help others to avoid making the same mistakes or to consider (unlike me) a variety of parameters before starting on their own, unique, journey.
In 2012 I built two single height raised beds from 2" x 6" x 10' finished cedar purchased from a local big box hardware store.
Note: Finished lumber simply means that the wood has been planed, giving the nominal 2" x 6" a true dimension of 1 1/2" x 5 1/2" - the length remains unchanged.
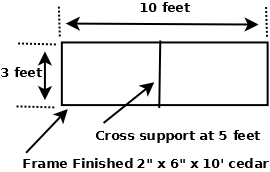
Each bed was constructed from 3, 10 foot lengths to give a dimension of 3' x 10' x 6". The width of 3 feet was simply to get 3 cross pieces from a single 10 foot length (OK, they could have been 3' 4" wide). All joints were made using No 8 3" deck screws. The cost per bed was approximately $50. Pretty pricey. The justification for the use of expensive cedar in this case was twofold. First, it was being placed in a very visible part of the garden, my friend insisted on aesthetic considerations. Second, it should last for a while. In our harsh Canadian winters, cheap pine might last 3 - 5 years, cedar around twice that time. It seemed worth it. With hindsight, there was no need to use a strengthening cross piece at the half way point with a 6" height and it could have been eliminated (and, since the cross piece is surrounded by moist soil, will, in any case, be the first part to rot). Simple screw joints are perfectly robust (as long as the screw is long enough). Many people advise corner posts, I consider them unnecessary for this size of construction material. However, the corner is where the rot will start first. Other than using, say, a galvanised metal corner fitting there is probably very little that will prevent this rot - even with corner posts. After 4 seasons, including being raised to double height, the original beds are still looking pretty robust at the corners. Touch wood.
The original beds were simply laid on the ground and filled with bags of cheap black earth. The weeds came through (as one would expect) but they kinda worked. As part of a major garden make over in early 2014 (see It Gets Serious) the beds were dug-out, lined with garden fabric, raised to double height and the soil replaced with my current soil mix and planted as flower beds.
Conclusion: They worked, were expensive and have lasted 4 seasons so far with no apparent degradation.
The second raised bed type was part of a major rework of the old vegetable plot in early 2014 (see It Gets Serious if you want the gory details behind the make over).
I planned a total of 5 beds (increased to 7 in 2015) at least one of which would be a double height (just to experiment with higher structures). Cost was an issue, as was the growing depth (the native garden soil is pure blue clay (see some thoughts on soil). I wanted to have at least 12 - 15" of light soil access for root systems before they hit solid clay, which meant a double or even triple height raised bed. This was going to get seriously expensive if the previous construction materials and methods were used. At approx. $50 per bed per 6" height for cedar a triple height bed would be $150 - and I wanted 5 of them! Time to rethink.
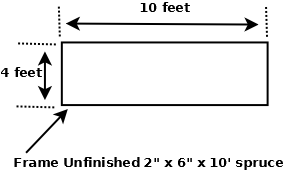
A local sawmill was able to supply 2" x 6" x 10' unfinished spruce for $7 per length. This would give a cost of approximately $21 per single height bed. Spruce does not last as long as cedar in our climate but their unfinished nature meant this was real 2" x 6" which would take proportionately longer to rot and meant it was structurally stiffer - the reinforcing cross piece could be eliminated - as it turned out, even for double height. However, this is rugged construction material. Aesthetically speaking, it could not be called svelte.
Bed width. The original raised bed design used a 3 foot width based on the need to create a bed from 3 x 10' lengths of lumber including a central reinforcing cross piece (total of three cross pieces). With the cross piece eliminated anything up to 5 feet in width was possible using 3 x 10' lumber. I elected to go with a 4 foot width since this would give me more growing area in the garden space I had available. I settled on the dimensions shown below.
Note: Raised bed width is one of those difficult trade off parameters. To optimize growing area to cost of construction means the bed should be as wide as possible. Against this is the need to stretch across the bed to access the center without inducing chronic back pain. There are a number of people who advocate a bed width of no more than 30" to give comfortable access to the centre. I use a 2" wide wooden batten placed across the bed to provide support when working in the center of a 4 foot wide bed but this can be awkward, and is useless if you need two hands to complete a task. Finally, if you plan to use row covers (for bug protection and/or season extension) the most commonly available covers come in 84" widths which are inadequate for a 4 foot wide bed when used with semi-circle support hoops. (Outside bed dimension is 52" giving semi-circle circumference of (52" x 3.14)/2 = 81.6" which means 84" row cover barely covers the bed and does not provide the essential seal - typically 4 - 6" on each side - necessary for the cover to be effective. However, 84" row cover works perfectly with a 3 foot'ish bed width.) Wider row cover material is available (118") but you have to look for it. On balance, I would probably now use a 3 foot wide bed if I were to start from scratch, perhaps go to 3' 8" or 3' 4" (3 cross pieces from a 10' length?) if I needed to optimize space/cost.
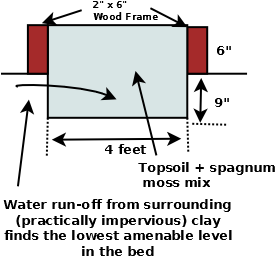
To achieve the 12 - 15" inch root growth target, the beds could be raised to double or triple height or I could dig down 9 or so inches, remove the clay, line it with garden fabric (optional) and fill it with a soil mix (current mix). I chose the latter method. I traded cost for my poor abused back. A cross section of the bed looks like than shown below.

This turned out to be a mistake. Not the first year, since we had normal rainfall, but the second year was very wet and the bottom 6 inches of one of the beds was near permanently water logged which I only discovered after the progressive loss of all the onions in that bed. The classic finger plunged into the ground did not show the problem. It was only finally diagnosed when it became clear it had to be the problem and a deeper excavation was carried out to confirm the diagnosis. The problem occurred for two reasons. First, the native blue clay soil surrounding the beds has a very low water absorption rate so small amounts of surface water after even modest rain (and not really visible to the eye) were all looking for the lowest level (as water tends to do) and found it in one of my beds (there is no discernable slope in the vegetable garden but there is always a lowest point) where it then proceeded to stay until it slowly percolated through the clay under the bed. Of course this has always happened. This year, however, before the bed had a chance to drain, more rain arrived which kept the bottom 3 - 4 inches of the bed constantly wet and frequently seriously water logged. The second problem is that the sphagnum moss in my soil mix is designed to retain moisture (as well as other things) and in this case it was simply exacerbating the already wet situation by clinging tenaciously to all that run-off water. Diagrammatically this process is shown below:
Is there a solution? Plant only very shallow rooted plants (see plant root systems), avoid those plants that hate wet roots, raise the bed to a second height or simply hope it rains less next year.
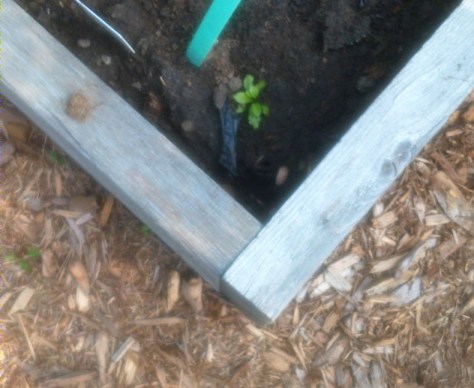
Single height raised bed as it emerged from winter hibernation with its fall rye cover crop (taken 18th April 2015 with snow still in parts of the garden).
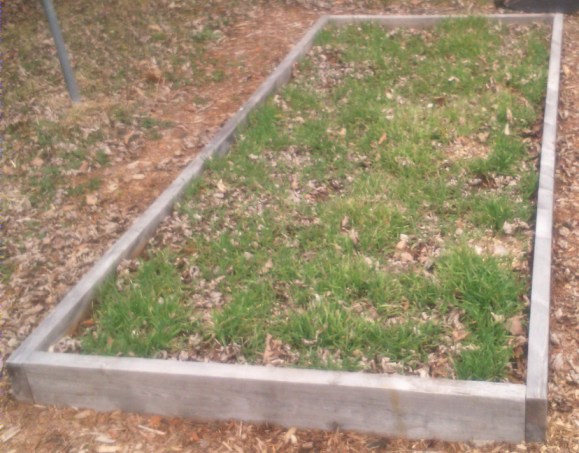
Simple butt joined and screwed corner detail. Absolutely nothing fancy.
I wanted to experiment with at least one double height raised bed to see how it worked, partly for future reference and partly out of curiosity. Is it easier to work with? Less back pain? Any downsides? I'm not getting younger - these are important questions!
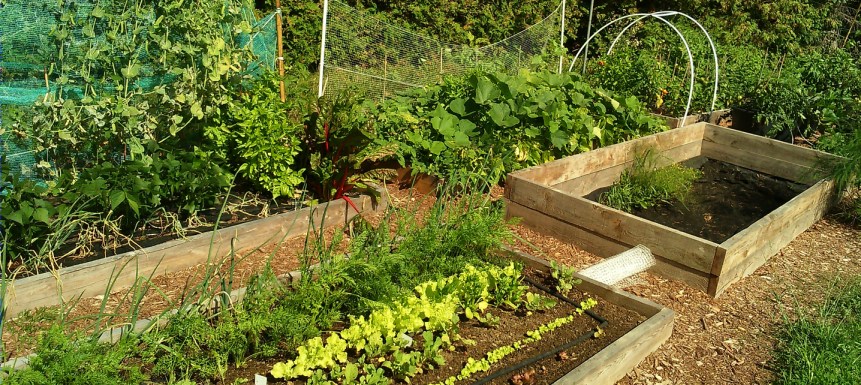
Having built the single height bed I knew something about the material (unfinished spruce) I was using so when it came to building a double height I simply placed a second frame on top of the first. No joins, no corner posts, no reinforcing cross pieces, no nothing. With the chunky material I was using, gravity was my friend. The first one has lasted through two seasons so far and has not budged (including being fitted with a floating row cover - acting like a sail) throughout the gales and snow of a serious Canadian winter while running a season extension experiment) and has not distorted in any way. A second double height bed was added in late June 2015. This photo shows single height beds in production with a double height under construction (taken August 2014). The double height was finally commissioned in early September 2014.
This photo shows a corner detail of a double height raised bed. Very crude. Very simple. Very effective.

Note: The white pipe on the right hand side is support for a row cover. It does not provide structural support.
Is this the right way to build multi-height raised beds? For a maximum of a two level structure (12") with this material this is the cheapest and simplest way to get a fully functional raised bed. If I went to a third level, even with this material, I would do it differently. Most definitely if using thinner construction material this would be a unsatisfactory and, perhaps, unstable method of construction. While I have not yet built taller (over two level) raised beds, I am (2015) contemplating doing so - see my current thoughts on raised beds.
Note: The original cedar raised beds were also raised to double height using the same method (simply laying one on top of the other) and they also have been remarkably stable. However, in this case a central reinforcing cross piece was always part of that construction and has, I think, proven to be essential.
For what they are worth here are my current thoughts on what I consider, based on my current experience, best practice for raised bed construction:
Board Height: Wood prices tend, certainly in our part of the world, to rise very quickly for wood over 6" in height - if you can even obtain it. Since the amount of soil weight contained in bigger board height structures also rises I consider it would be prudent to always use a reinforcing cross piece (though not necessarily a full height cross-piece) to avoid excessive distortion (bowing). I like 6" board heights and plan to stay with this height.
Board Length: I have only used 10 foot bed lengths since the timber is very reasonably priced. This length, in my experience, gives the best growing area/cost ratio. Many people use shorter lengths, say, 8 feet or even shorter which may be necessary due to space or other constraints. I'm completely agnostic on the subject of raised bed length. Cheapest is bestest!
Board Thickness: I consider anything less than 2" (or its 1 1/2" finished equivalent) to be a false economy. I've seen 1" thick boards being used but they looked flimsy and already showed signs of warping. Thin wood will also disintegrate faster than thicker wood (rotting progresses at an annual rate or at weak spot). I now swear by my chunky 2" unfinished spruce. It's cheap and solid. What's not to like if you can find it (only at a local sawmill in my experience).
Bed Width: The wider the raised bed the more cost effective it is, all other things being equal. While I currently use 4 foot wide beds (external dimension is 4' 4") as having the best growing area to cost ratio they do have serious disadvantages (center access and floating covers - see above). If starting again I would probably use a width between 3 feet and 3 feet 8" (more easily available floating row cover widths and easier center access). However, a number of people make a strong case for 30" being the maximum width that allows pain-free center access. As a final point, the narrower the bed the lower will be the percentage of growing space in any given area (due to inter-bed paths). This one is real trade-off.
Note: Theoretically, given 3 pieces of 10 foot lumber the most cost effective width is 5", however, over and above the issue of center access, if you plan to use plastic mulch then commercial mulches (of whatever color) tend to come in 4 foot widths.
Corners: I've only ever butt joints used screws. No corner posts or fancy joints. With the right sized screws (No. 8 3 - 3 1/2") they work just fine, take no time to build (even for a wood butcher like me) and seem to last (4 seasons so far in 2015). Aesthetically, they may lack the appeal of corner post with little fancy tops on them but you also don't rip your legs on those jutting out tops. This one I suspect is simply a question of aesthetics (and money) versus the purely functional. Different matter when you come to multi-height beds (see below).
Cross Pieces: In 10 feet lengths I have both used and not used cross pieces. With finished wood (1 1/2" thickness) they are probably on the edge of being necessary. With anything shorter than 10 feet bed length I would consider them to be superfluous. With my chunky 2" unfinished lumber they are superfluous up to double height - though I would probably use them on every level except the top level or two on greater than double heights - anything to save a buck. Just to be safe.
Note: Soil weight is a serious consideration. My current soil mix is about 2/3rds the weight of an equivalent pure top soil. If using heavy soil (which is not really a smart thing to do) I would be tempted to always use a cross piece on the lowest levels - even on double heights.
Dig Down or Build Up: To get any given root depth you can either dig down some part or just build up from flat ground. I have both types. I have no problems with the build up beds (currently only two levels) but I do have a problem with one of the dig down bed due entirely to the drainage (lack of) in my surrounding clay soil. If starting again I would, probably, do a simple test by digging a small (1 foot square) hole in my proposed location to the depth that any planned dig down would be and inspect it after rainy weather. If water builds up and persists for more than 1 - 2 hours I would build up, else I would dig down (it's much cheaper and you only do it once).
Multi-height (> 2): I'm contemplating doing a 2 foot high (4 level) 10 foot long raised bed in the next year (2016) for a bunch of different reasons. My current design idea is to use my existing chunky (unfinished) wood with a reinforcing center piece (perhaps only 2" x 4") on every level but the last two. For the corners I'm planning to use galvanised angle iron placed on the inside of the bed (dare I say for aesthetic reasons). The ends will continue to use my normal screw connections but I'll use a 1 1/2" screw from the inside through the angle iron into the wood (if using finished wood use a 1 or 1 1/4" screw) just to add some strength. We'll see.
Gap Between Beds: My raised beds are laid out in two rows of three beds (roughly). I lay down garden fabric in the gaps and mulch with wood chips to avoid creating a glutinous clay mud when it rains and to restrict weeding as much as possible only to the beds. (It also has the advantage that other people do not mind harvesting if they are certain that their delicate shoes will emerge unscathed from the experience - even following or, exceptionally, during rainy weather.) The gap between each row of beds is 12" and the gap between beds in a row is 18". This works but bushy plants spill into the 12" paths in the height of the season meaning it can be a squeeze. When trellises are added it takes a further 2" off the path width. I would definitely use 18" (perhaps more if you need wheelbarrow access in mid-season - my wheelbarrow is 26" wide) for all gaps if starting again. But again it will depend on just how much growing area you want, or need, given your space constraints - wider paths = less percentage growing area.
Frame Replacement: I'm ashamed to say that I've not yet considered this one in detail - in my defence I've got 5 to 8 years (hopefully) until confronted by the problem. The frames will eventually rot to the point they will collapse. I don't see single height beds being much of a problem. I would replace the frame as the beds are being prepared for the winter rather than wait for spring (there is already more than enough work to do in spring) and I'll likely do it before they completely collapse - even if it means sacrificing a possible season. Double (or more) heights could be much more of a problem as there is really no way to avoid a soil collapse as you remove the bed frames. I'll probably put down a tarpaulin, dig out the beds as much as necessary (that means the absolute minimum), rebuild the bed frame and replace the soil. Again in fall.
The following topics are not related to raised bed construction but are perhaps even more essential when using raised bed gardening.
Raised beds are really more like containers than growing in flat ground. I see no point in not modifying the earth in a raised bed and every advantage in doing so - especially if, like me, you have good, solid clay better for making pots than growing things. Anything to make the soil lighter and more conducive to rapid root growth to increase nutrient uptake. I currently use about 20% sphagnum moss to both lighten the soil and provide moisture retention (and, yes, I have guilt pangs about sphagnum moss sustainability) and 80% top soil - amended every year with some compost. Coir is touted as the only sustainable method to lighten soil - but shipping this stuff thousands of miles does not appear terribly sustainable to me (and the cost, my goodness, have you ever priced this stuff). I was surprised to note recently that perlite appears to be very competitively priced these days if bought in the kind of bulk necessary for raised beds. I will be very tempted to use it instead of sphagnum moss in the future (it also does not break down like sphagnum moss), having previously rejected it entirely on cost grounds.
Soil Purists Many 'real' gardeners would say that the level of soil modification (essentially replacement) described above is 'cheating'. And certainly not sustainable. That one of the challenges of gardening is to work with what you have and make it better. Two years ago I had little, if any sympathy, with this point of view. I was in a hurry. I wanted results immediately. I'm much more sympathetic to it now. I believe there are a number of natural techniques (mostly using selected cover crops) to ameliorate even the most hostile ground. These techniques are not, generally, a part of mainstream gardening literature and that, I think, is a big mistake. However, let's also get this in perspective. On a recent field trip, a lecturer at a local horticultural school, and for whom I have a lot of time, was using simple cover crops to ameliorate a clay soil from its current 3 - 4" of good crumbly soil to a target of 8" to 12". He reckoned to get approximately 1" improvement every year and his target timescale was 8 years. If you are a farmer or horticultural producer perhaps you have very little choice other that to try and 'fix' your land. I do. I am, however, trying a modest experiment (based on my reading of the subject) in fall 2015 with my clay soil to see if it's possible to speed up the amelioration process, but even with fantastic results I think 3 - 5 years is still an extremely optimistic target and that was still too long for my initial requirement. I'd still 'cheat' when creating a modest vegetable plot because the cost is reasonable, the results terrific and the timescale is immediate. Different matter entirely in large scale operations or if means are extremely limited.
In fall 2014 I decided to change my wintering policy completely after an early frost during the 2nd week of September devastated 2/3 rds of my raised beds. Previously, I had just emptied the beds and walked away. The bare earth throughout the winter had always vaguely offended me but I knew no better, and it kept work to a minimum (generally a good thing, in my opinion). Nature had usually done a half decent job by covering much of the beds with blown leaves before the snows started.
New wintering policy sounds like a big deal. But it caused a lot of thinking (ouch) and generated a lot of questions.
First question, why pull out the plants? I read lots of gardening columns and gardening experts on the topic, some insisted it had to be done (the sun would fall out of the sky otherwise), some said it was not strictly necessary. Typical gardening advice. I finally decided to not pull out the plants at season end (obviously diseased plants are pulled and burned throughout the season) based on the following reasoning (salted with a generous measure of sloth). First: If I pulled the plants they were going into the compost pile which would eventually be returned to the raised beds - this smacked of unnecessary and pointless work. Second: When you pull out a plant you pull perhaps 1/3 of its roots at most - the majority of roots were already being left in the beds and composted. Why not just leave them all in the ground. Third: Leguminous plants have nodules that fix the nitrogen. Pulling the plant would put most of this is the compost pile. Again pretty pointless. Fourth: All the beds are rotated. Anything vaguely unpleasant from this year's crop should not affect next year's different crop (and indeed unless you steam sterilize the beds every year this will always be true). So I now cut off the plants at the soil surface and that's it. When the beds are prepared the following spring any woody stuff is lifted, chopped up and goes into the compost pile.
Next, the question of what is called, as I discovered, cover crops (or green manure). This is serious stuff as I now know. But in the fall of 2014 I needed something that would germinate during October (in Canada) and stumbled across a reasonably priced packet of fall rye labelled as green manure in a local garden center. I threw the seeds into the beds (densely because I figured I would have a low germination rate due to the cold, and of corse there was no helpful advise on the packet), raked them in and stood back to watch. They germinated and there was a thick green carpet on each bed as the snow started falling. I breathed a sigh of self-righteous relief as winter closed in.
While cover crops are more traditionally associated with commercial farming (having read tons of stuff on the subject this is probably the most comprehensive material available - free online version) I think they are terribly under-rated for the raised bed gardener (or any gardener for that matter) - especially if you have poor, or positively hostile, soil - since what would otherwise be fallow time (late fall and very early spring) can be put to productive use to amend or improve the soil. We may not get into our gardens seriously until May (earlier for hardy vegetables or with season extension), but mother nature has been busy long before that (similarly from fall into early winter) as evidenced by the weed growth in a bare soil raised bed in what we call spring - why not let nature grow something that we decide rather that adopt its default position of weeds everywhere. Each cover crop has certain characteristics (there are perhaps 20 -30 different types) depending on soil, climatic conditions and seeding time. Like everything else in gardening what starts simple, quickly gets complicated as you delve into the topic.
In Spring 2015, as the snow receded, my raised beds were still thickly carpeted with a green fall rye crop. Looked good. Fall rye has two characteristics that make it useful and one that make it difficult. It germinates very late (perhaps even late October here in Canada or around 1 to 2°C or 34 - 36°F). It adds organic matter through its dense root system (really gorgeous roots). However, that dense root system makes it damn near impossible to kill in the spring! Finally, it's a nitrogen scavenger meaning it sucks up nitrogen from the soil which in commercial farming is a great thing because it prevents nitrogen run off from polluting rivers and lakes. In the garden, however, it means that you have to dig the bed and try and kill the rye by burying it at least 2 - 3 weeks (so it will break down and give back its nitrogen) before planting. Easier said than done.
Rant: The really interesting cover crops are normally only available in commercial farming quantities (~50 pound sacks) which makes them impossible for use in the garden.
In fall 2015 I'm going to experiment with a modest cocktail of annual ryegrass (50%), peas (30%) and fall rye (20%). Ryegrass adds organic matter but is killed by a Canadian winter and will germinate fairly late (4C/40F - perhaps around early October in Canada zone 4B). Peas - should be field peas (sometimes called Canadian Peas or Austrian Winter peas) which are impossible to source in other than commercial quantities so I will use all the unused peas from the summer and buy pea seeds on discount at the end of the season). Peas are a legume so will add nitrogen, they germinate as late as early October in zone 4B, tolerate modest frosts but are also winter killed. Finally, fall rye because if winter comes early, something will germinate (it germinates as low as 1-2C/34F), provide at least (sparse) cover and keep a living root in the ground. The smaller quantities should make killing easier in spring 2016. If it all germinates (I'll sow around 1st week October, earlier if we have an early frost) and there is about 3 - 5 weeks growth before heavy freezing then I should have a mat of dead stuff (ryegrass and peas) to prevent any soil loss (and easy to dig-in come spring), some nitrogen added, more organic matter and a modest sprinkling of green cover (the rye) to last into early spring. It's a compromise. What ain't.
In fall 2014 I ran a season extension experiment with floating row cover (rated to -4C/29F) over a salad filled raised bed. It worked well until I had to remove the water irrigation due to the freezing danger in late October. Rain obviously passes through the row cover but not snow. I finally lost the salads (they wilted) due to lack of water when the first snows started - not the cold! I left the cover in place throughout the winter just to see what would happen. Two things did: the cover handled the snow loads throughout the winter and finally broke (at the 4-way cross piece) in early April - perhaps due to the continuous thaw/freeze cycle as winter ended; the salads burst back into life at the first rains in early April! I now use the floating row cover for freeze protection in May for tomato, pepper, cucumber and eggplants/aubergines and continuing bug protection for cucumbers (against the dreaded cucumber beetle) until around mid-end June when it is removed and trellising started. I used it for summer bug protection in a new (2015) partially shaded raised bed in a very bug-friendly part of the garden and which let me grow radishes and spinach during August, and I should have used it to protect cabbages from the egg laying ravages of butterflies.
Simple metal hoops with no central ridge are typically used to support floating row cover when growing field crops. I decided on a more robust construction (with a central ridge) since any, even modest, season extension in our climate may have to handle snow loads.
Note: The most commonly available row cover material is 84" wide. This will not fit a 4" wide bed and provide any seal (vital for both freeze and bug protection). Either use a narrower raided bed width (max of 3' 4" to 3' 8") or look for 118" wide row cover which is available.
The row cover frame is made from 1/2" PEX piping available from any big box hardware store. Some folks say this can simply be bent by hand to create a 4 foot semi circle. When I tried it the forces were excessive, so I decided to bend the PEX pipes using steam heat and a crude bending jig, then join the parts together using 2 T-pieces and a 4-way cross piece. This photo shows the finished structure without a row cover:
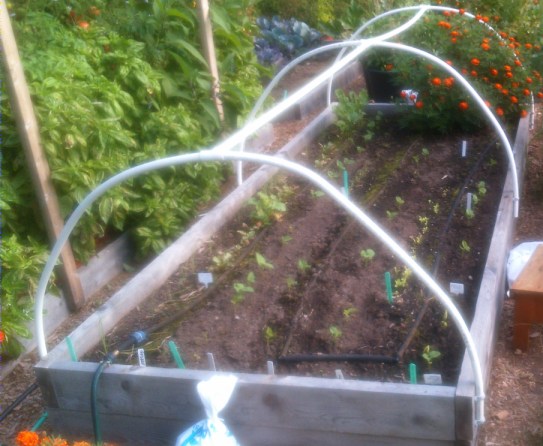
The slightly flattened front hoop shows what happens when the pipe is not hot enough before applying the bend (I was getting bored). The rear two are almost perfect (honest).
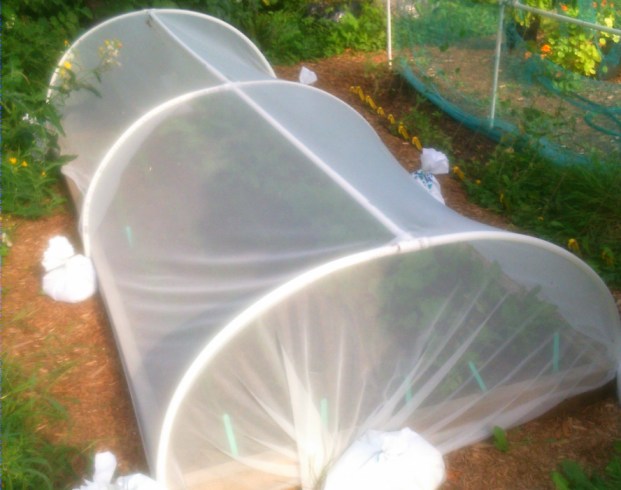
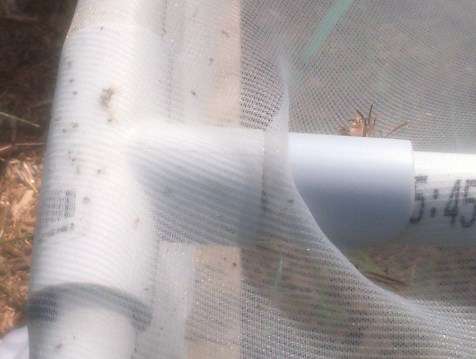
This photo shows a hoop structure with a bug mesh floating cover. The photo also shows the use of weighted bags - referenced later in the text - to secure the cover.
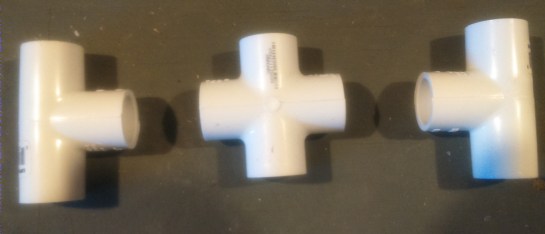
Each hoop is made from 1/2" PEX tubing in two parts (1/4 circle each). There are three hoops for each 10' raised bed so you will need 6 bent pipe parts. The end hoops are joined with a standard 1/2" T-piece available from any big box hardware store. The center hoop requires a 4-way cross piece which is typically only available from either a specialized plumbing store or direct from the manufacturer.
Note: PEX piping is not UV treated. It will eventually become very brittle and fall apart after perhaps 2 - 3 seasons (storing inside during winter may give you 3 -5 seasons). Finding suppliers of UV treated PVC and unusual joints - including 4-way cross pieces - takes serious effort. This US based site (I'm not associated in any way with this site and have never used it) is on the slightly expensive side but seems to stock everything you could need. However, shipping to Canada will cost you serious money - US readers will not encounter the dubious pleasure of dealing with Canada Customs. Simplified Building PVC Products.
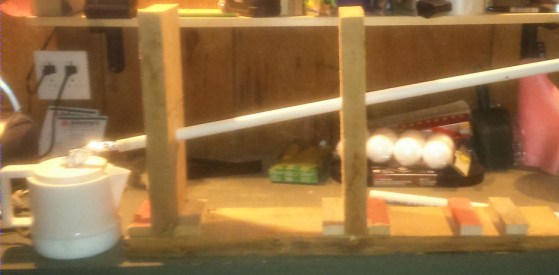
There are plenty of youtube videos showing how to heat a PEX pipe with steam prior to bending to the required shape. (In my case a $5 electric kettle from a used appliance store and a custom made (!) aluminium foil spout to force the steam into the pipe held in a simple wooden jig. Be very careful, steam is very hot - use oven gloves when handling the heated pipe.) The jig to bend the heated PEX pipe to the correct radius was trivial in the extreme.
This is my steam heat pipe bending jig. When the pipe is hot enough to bend it will start to naturally fall under its own weight at the right hand side. How far before it's ready to bend to shape - question of judgement! Generally, longer than you think.
In my case each bed is 4' 4" (4' wide bed plus 2 unfinished 2" width frames) = 52". The PVC connectors (both T and a 4-way cross piece - see photo below) requires 1" of straight pipe on each side and has a 1" gap. The adjusted width becomes 52 - 3" = 49". Adjust for your own raised bed width dimensions. Each 1/4 circle has a radius of 49 / 2 = 24 1/2" and a length of (pi x diameter) /4 = (3.14 x 49") / 4 = 39" (rounded up - we are not building the Eiffel tower). Add back our 1" of straight pipe for the top connector and allow a 4" straight length at the other end to attach to the side of the raised bed and we get a length of 39 + 1 + 4 = 44". Cut 6 lengths of PEX pipe to this size (or your adjusted size).
PEX T and 4-Way Cross Pieces.
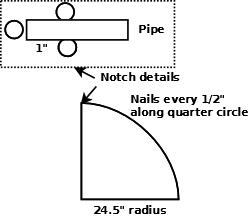
For the bending jig I used a piece of 4' x 4' plywood I had lying around (from a solar heating experiment!). I added a single nail as the center of a circle, drew a right-angled vertical and horizontal line 24 1/2" long and then drew a quarter circle of radius 24 1/2" inches on the plywood to intersect these lines using a marker pen tied to a measured length of string. I hammered 1" nails about a 1/4" deep every 1/2" or so along this quarter circle line to create the bend template. To create the 1" connector straight piece I placed a further nail, a pipe width away, across from the first nail at the vertical line and a second nail 1" away at the half pipe width point to create a stopped notch (see photos below). One end of the heated pipe is placed in the notch, secured with one hand while the other hand (both wearing oven gloves) bends the pipe with an even motion round the nail template. Complete this operation as quickly as practical - it should take perhaps 4 to 5 seconds after removing the pipe from the steam heat. Hold the pipe in the bent position for about 1 minute and then release it. The key factor is to get the PEX pipe warm enough, generally about 5 - 8 minutes under steam heat is long enough. If it not warm enough it will tend to bend unevenly but will still be perfectly usable (see photo above).
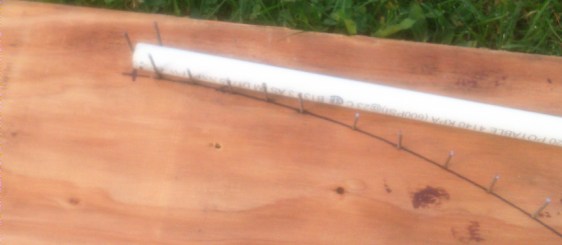
Bending jig showing pipe fitted into notch ready to bend round nail template.
The center ridges consist of two pieces of 1/2" PEX pipe cut to 4' 10" when used with 10' long beds - essentially take half your bed length and subtract 2" (for the PVC connectors). I do not use PVC glue but just manually push all the pipe and joints together when assembling the structure. This also makes winter storage much simpler and quicker - simply pull apart the structure to occupy the minimum space.
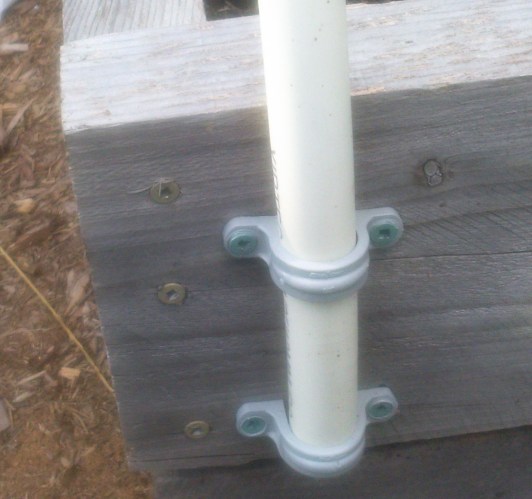
The hoops are secured to the raised beds using plastic 1/2" electrical conduit clamps available at any big box hardware store. I use 2 for each end hoop and one for the center hoop for a total of 10 (they typically come in packs of 5). The clamps are secured to only loosely pinch the pipes. This means that assembly/disassembly is simply a matter of pushing/pulling the pipes into/out of the clamps rather than having to carry a cordless screw driver around.
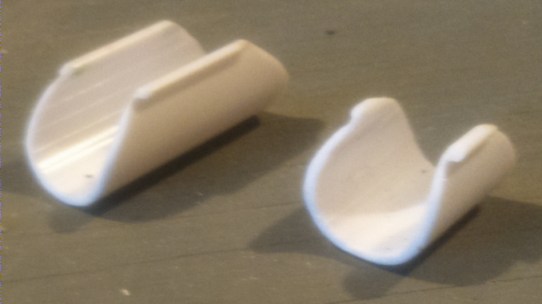
The floating row cover is attached along it's center line (thoughtfully marked on most row cover) to the top of the ridge poles by 3 cover clamps. These clamps are available in a variety of dimensions at many horticultural stores and are typically used to secure greenhouse plastic to metal or plastic pipes. They normally have square (sharp) ends and are 6" in length which provides a ferocious amount of grip, way in excess of that required for row cover. The net result is to tear the row fabric cover when trying to remove the clamps. I cut each 6" clamp into 3 (each 2" long - provides plenty of grip), cut off the corners and sand papered them smooth as shown below. I have never lost a cover in high wind nor have I ripped one since carrying out this highly complex modification.
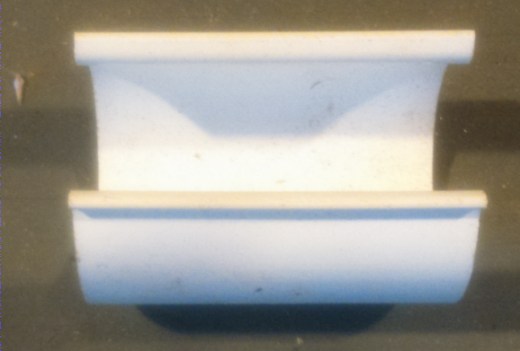
Modified cover clamp securing mesh bug cover.
Cover Clamp showing 6" length and square ends - great cover ripper.
Modified cover clamp in 3" and 2" versions (I only use 2" version now), with rounded ends.
Finally, the base of the fabric is secured using weighted bags (UV treated bags filled with small stones, sand or even good old dirt from the garden). Each weighs around 5 - 8 pounds (2.5 to 3.5 kilos). You need between 4 and 8 of these per raised bed, depending on how windy your local conditions are.
In 2015 I decided to trellis tomatoes and cucumbers for the first time using tomato clips to replace my normal canes plus velcro strips (I have used tomato cages but do not like them). The trellises worked very well - the tomatoes loved it, cucumbers - not so good because of increased bug vulnerability but I have a plan for next year! The trellises are 6 feet high, run the full 10' length of the raised bed and are the lowest cost solution I could come up with.
They consist of two pairs of wooden (2" x 4" finished pine) uprights placed (4" side against the bed) 3 feet from either end of the bed and simply screwed into the raised bed frame (each with 2 or 3 x No 8 3" deck screws). Each pair of uprights is joined at the top (using 2 x No 8 2 1/2" deck screws) by a cross piece (again 2" x 4" finished pine) of length 4 foot 4" (outside width across a 4 foot bed made with 2" thick unfinished lumber) which has 1 inch holes drilled at 10", 26" and 42" from one side (providing for 3 rows of plants with 16" row spacing and 8 inches to the edge of the bed). Depending on your chosen bed width or your plant spacing your dimensions here may vary. Drill the 1" inch holes on the bench before assembling the structure. The horizontal trellis support is provided by 3/4" EMT conduit (available from big box hardware stores and is both cheaper and more rigid than plastic PEX piping) which simply slides through the holes of the two cross pieces as shown in the two photographs below, gravity does the rest. (I'm only using two of the three possible rows this year as shown in the photos below).
The vertical trellising strings (garden jute twine) are tied to garden wire (from the dollar store) fixed at the level of the raised bed which runs the length of the bed (wrapped around partially sunk screws in the top of the bed frame) and at the same spacing as the holes in the top cross piece (10", 26" and 42" from one side in my 4 foot width bed size) and tied off on the top EMT conduit. The base wire simply provides an anchor for the bottom of the twine to stop the plants flapping around in the wind, it need only be lightly hand tightened. Similarly, the vertical strings need only be loosely tied and should have no tension. As the fruit begins to grow all the strain will come from the top so make sure the top knot is secure. The vertical strings should be placed next to each plant and additional strings can be added throughout the growing season if required. Tomato clips secure the plant to the twine.
Cost per Trellis (2015): 3 pieces of 2" x 4" x 6' finished pine at $6 each = $18, plus 2 (in my case) 10' 3/4 inch EMT conduit at $8 each = $16. Total per trellis is 18 + 16 = $34 ($40 if 3 EMT conduit pipes).

View showing two raised beds fitted with trellis framework and EMT conduit in place. The red plastic mulch for the tomato bed - replacing the normal black plastic mulch - was another of this year's (2015) experiments - it seemed to work. The tomato crop was much better this year than last year but there were too many changed variables to know if the red plastic had any significant effect. I will, however, use it again next year.
Note: The uprights are placed in from each end of the raised bed. While I used 3 feet from each end this is not a critical dimension. The key point is that any unsupported length of pipe will tend to distort when weight is applied (a single fully fruited tomato plant probably has 10 to 30 pounds of fruit at its maximum - perhaps even more if you are, unlike me, a gifted gardener). By placing the uprights in from each end you simply minimize the unsupported pipe span and hence minimize the pipe distortion.
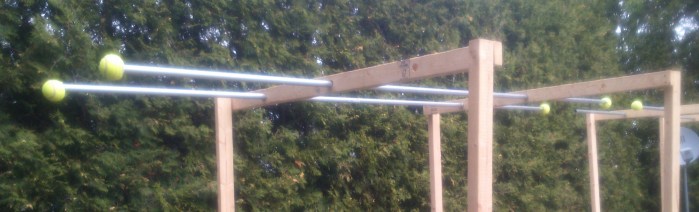
View of trellis top showing the EMT conduit in place. The EMT conduit has slightly sharp ends - the end protection for tall gardener's heads is simply super cheap dollar-store tennis balls with a cross cut on one side, rammed onto the EMT conduit ends.
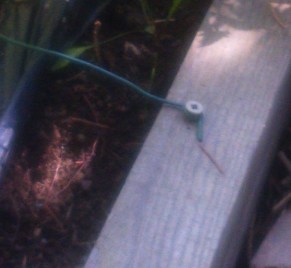
Base trellis wire secured to raised bed frame by partially raised screw.
The structures work very well. They are not as strong as the Eiffel tower but are more than capable of handling the vertical load (300+ pounds) imposed by reasonable tomato yields. However, if one were to stumble and fall onto the structure from the side they would be unlikely to take the strain, having only a screwed connection at the base. If you have doubts, or young children who careen around the garden causing delightful havoc, then you might want to consider adding strengthening 45 degree angled pieces at the base of each upright as a quick fix.
These Trellises will be taken down at the end of the season because of plant rotation. One change will be made and a further improvement investigated. The change will be to drill the cross pieces to take a carriage bolt and wing nut (replacing the current screw connection). This would only save about 5 minutes every year but importantly would turn assembly and disassembly into a 1 person job. An extra pair of hands is not always available in my case when needed.
The change to be investigated depends on the acquisition of modest metal working skills during the winter. I propose to make a plate approximately 6" x 12" and braze or weld a 1 1/2" x 3 1/2" (inside dimension) vertical rectangular tube about 12" high to the center. These plates (4) would be permanently attached to every bed that could be trellised. Come the season start, one would simply slot in the uprights, bolt together the cross pieces, slide in the EMT conduit and one is good to go. Additionally, this plate should add significantly to the horizontal strength of the structure (it would likely pass the stumble test, perhaps not the young child projectile test) and avoid the need to find fresh wood to screw into every couple of years of so when a bed is reused for a trellised crop.
I plant out tomatoes, peppers, aubergines and cucumbers around mid-May (our official last frost date). In 2015 (first year trellis use) we had a panicky frost warning in the last week of May. Trellises are not easy structures to protect with freeze protection row cover as I discovered when I tried it. From 2016, I will plant out at my normal mid-May date but use canes for support until the plants are around 2 feet tall (early - mid June), then erect the trellis and remove the canes. This means that in case of late frost warnings I can simply throw covers over the bed or even use hoop structures to provide row cover protection for the cucumbers especially (against early season cucumber beetles) and perhaps gain a little greenhouse effect to get a jump start on the season. It may be a little more work but all my plants would have been lost if 2015's warning had been a real frost. What's an extra hour's work in comparison.
Problems, comments, suggestions, corrections (including broken links) or something to add? Please take the time from a busy life to 'mail us' (at top of screen), the webmaster (below) or eagle-eyes at hillofbeans. You will have a warm inner glow for the rest of the day.
|
Copyright © 2005 - 2026. HillofBeans.Org. All rights reserved. |
web-master at hillofbeans Page modified: January 20 2022 |